French manicured nails ooze with a chic and polished look that is a synonym of well-taken care of hands. It is very easy to do this type of a manicure at home, even if you are a total beginner. You might have problems the first or the second time but you will easily get used to.
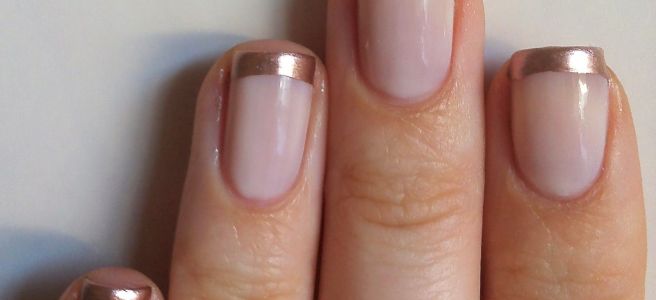
Usually, the French manicure is made with a clear base and a white nail polish but, you can put a little twist to it by choosing a rose gold nail polish instead of white. The rose gold colour will look more natural and will blend with the skin of the tone, whereas white gives a striking contrast and makes the nails very noticeable.
Here is what you need before starting with the manicure:
- Nail polish remover
- Nail clippers
- A file and a buffer
- Cuticle remover/ cuticle oil
- Rose gold nail polish
- Clear top coat
Now, let’s move on to the steps.
Step 1
With the nail polish remover, remove the old nail polish you have on. You can use a cotton swab dipped into some nail polish remover. Make sure all the corners and cracks are clear because any remaining colours will be easily seen through the shiny transparent top coat of the manicure.
Step 2
Trim your nails with the nail clippers, but make sure they are long enough so you can pain the nail tips with the rose gold nail polish. Trim the nails just to bring them into shape and make sure they are all even.
Step 3
Use a file to even some sharp edges and use the buffer to smooth the edges and the surface. The recommended shape of the nails is crescent but you can file them into a square or round shape if that is how you prefer. Keep in mind though, that you shouldn’t use the file in saw-like movements as you will damage the layers of the nails.
Step 4
Soak the hands in water so that the nails are cleaned and the cuticles are softened. Then by using a stick and a cuticle remover, push the cuticles back and if there is a need, trim them with the nail clippers. However, it is not recommended to often cut the cuticles because that leaves them open to infection which can cause serious deformities on the nails. You can also use cuticle oil to nourish the skin area around the nails.
Step 5
Apply the base coat of the nail polish – the transparent base. You can also use very pale pink or cream if you want the look to be more blended and natural looking. Apply the nail polish base by painting a stripe down the centre, then two more stripes on each side. Then wait as long as it is necessary for the base coat to dry. You can apply one more layer of the base coat if you wish for a more intensive effect.
Step 6:
Next is painting the nail tips with a rose gold nail polish. For this step, you need a steady hand because you need to paint tiny rose gold crescents on the nail tips. You will probably have problems to do it on the right hand if you are right-handed or vice versa, so a solution to the problem will be using a tape (let it be nail tape with weak adhesive so that you won’t mess up the already applied base coat). Finally, you can use a remover pen to precisely touch up or shape the area.
Step 7
Apply a glossy top coat nail polish to protect the nails from messing up. Also, it will make sure your manicure lasts longer.
